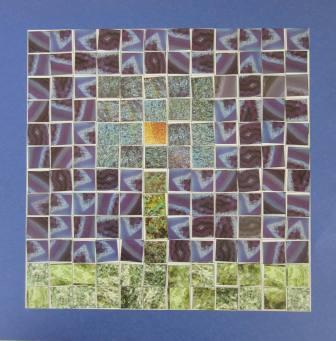
Rock & mineral mosaic Project samples
 |  |
art concepts
**Symmetrical balance
**Asymmetrical balance
**Repetition
ART VOCABULARY:
symmetry, asymmetry, mosaic, legend
**Asymmetrical balance
**Repetition
ART VOCABULARY:
symmetry, asymmetry, mosaic, legend
cross-curricular connection
SCIENCE
Topic 3: Rocks & Minerals
Topic 3: Rocks & Minerals
skills & techniques
**Collage
**Mounting
**Grid Design
**Replication of Design
**Mounting
**Grid Design
**Replication of Design
Material
**Mosaic Tiles
**Construction Paper (for mounting)
**glue stick
**mosiac project prep sheet (attachment below)
**mosaic project grid (attachement below)
**Construction Paper (for mounting)
**glue stick
**mosiac project prep sheet (attachment below)
**mosaic project grid (attachement below)
| mosaic project prep sheets |
| mosaic project grid |
procedure
***All images, links and videos are on www.elementaryartbox.blogspot.com
1) Watch 'symmetry' video. Talk about symmetrical and asymmetrical balance.
2) Look a pictures of mosaics discuss whether they have symmetrical or
asymmetrical balance.
3) Put up a 10 X 10 grid with an asymmetrical design on the board/SMART board.
Number and letter the rows and columns on the grid. Mark the horizontal and
vertical line of symmetry. Create an asymmetrical design using red/yellow/blue.
Discuss why design has asymmetrical balance.
4) Hand out mosaic prep sheet. Students should number/letter the first grid. Then
take out markers/pencil crayons in the three primary colours and translate the
design onto the grid on their mosaic prep sheet.
5) Put up a blank 10 X 10 grid. Number and letter rows and columns. Students
hould do the same. Find and mark the horizontal and vertical lines of symmetry.
Together, create a symmetrical design on the board. Students should translate
the design on their mosaic prep sheet.
6) Students should then create a design of their own and label whether it has
symmetrical or asymmetrical.
7) If students can demonstrate that they understand the concept of symetrical and
asymmetrical balance they can then begin to design their Rock & Mineral mosiac.
They will do this on larger grid which is on the back page of their prep sheet.
8) Hand out project grid (print out on 11 X 17 paper). Create legend to translate the
design colours to actual tiles. They will then Re-create their design on the project
grid by gluing down rock and mineral tiles.
9) Crop mosiac. Mount on contstruction paper. Glue legend on the back.
Optional
***I chose to lamenate the mosaics before displaying them. to ensure that all of the tiles would stay in place.